> For the complete documentation index, see [llms.txt](https://docs.powerfulform.com/llms.txt). Markdown versions of documentation pages are available by appending `.md` to page URLs; this page is available as [Markdown](https://docs.powerfulform.com/~/revisions/QfT5grjCUlVNVWzLkzdM/customer-fields/add-customer-tag/add-customer-tag-dynamic-tag.md).

# Add Customer Tag - Dynamic tag

### 🎯 What Is a Dynamic Tag?

A **dynamic tag** is a tag that gets assigned to a customer based on their form response.&#x20;

For example: if a user chooses “Wholesale” in a dropdown, the tag “Wholesale” will be added to their customer profile. If they select “Retail”, the tag “Retail” is added.

Dynamic tags help you organize customers easily and tailor follow-ups or offers based on their preferences.

***

To achieve this, please make sure the form is connected to Shopify Customers first. [Learn more](https://globo.io/kb/how-to-connect-form-elements-to-shopify-customer-data/)

### 🛠️ Steps to Enable Dynamic Customer Tags

1\. Open the app > click **Forms** > open the form you want to edit

2\. Click the **Integration** icon on the left side > enable **Shopify**  and click on the **shopify** option

<figure><img src="/files/qLuXyU9IrOvesIxPwXk2" alt=""><figcaption></figcaption></figure>

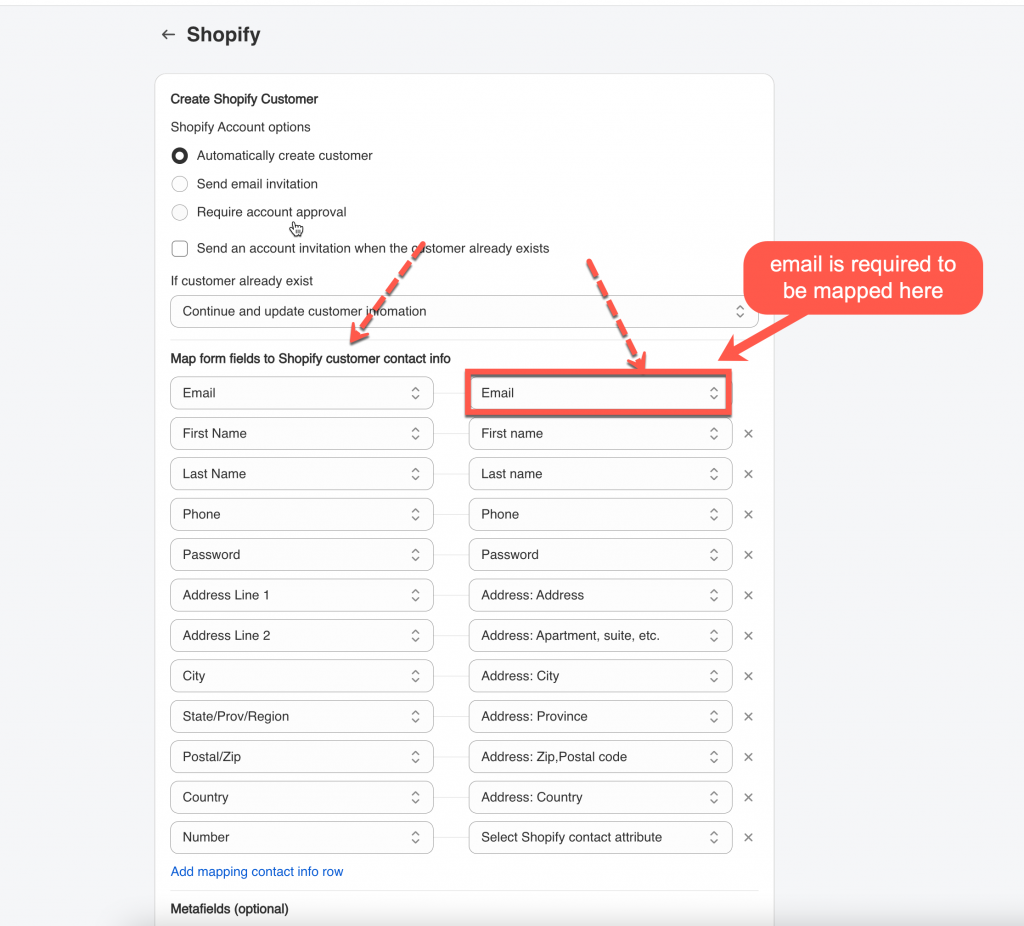
3\. Select Shopify attributes (on the right) to map with form fields (on the left). For example the Last name field of the form should be mapped with Shopify last name attribute,

⚠️ **Email** field on the form is required to be mapped with E**mail** attribute of Shopify.

<figure><img src="https://da76v9kevdkud.cloudfront.net/wp-content/uploads/2024/05/2024-05-31_14-53-59-1024x926.png" alt=""><figcaption></figcaption></figure>

4\. Tick on the checkbox **Add tags base on form’s answer** > click **Add another tag**  > select a form field in the dropdown

\=> the answer customers select/enter on the field will be added to Shopify customer tag after the form is submitted

**Example**: if you have a “Customer Type” dropdown, choose that field. The tag added will exactly match the customer’s answer (e.g. “Wholesale”, “Retail”, “VIP”, etc.).

<figure><img src="/files/Etdc1WOsHxB7G1ntCYKp" alt=""><figcaption></figcaption></figure>

5\. Ticket on the checkbox **Override customer’s existing tags** (optional)

6\. Click **Save** to apply your changes.

***

### ✅ What Happens After Submission

Imagine your form has a dropdown field **“Customer Type”** with options: *Retail*, *Wholesale*, *VIP*.

<figure><img src="/files/yUJVLxb2fa7Ry5fiB2jU" alt=""><figcaption></figcaption></figure>

<table><thead><tr><th width="292.04998779296875">Action</th><th>Result</th></tr></thead><tbody><tr><td>Customer selects <strong>Wholesale</strong> and submits</td><td>Their Shopify customer profile gets the tag <strong>“Wholesale”</strong> automatically</td></tr><tr><td>Customer selects <strong>VIP</strong> later and re-submits (with overwrite enabled)</td><td>Their tags are updated — previous tag removed, new tag <strong>“VIP”</strong> assigned</td></tr></tbody></table>

<figure><img src="/files/22bpCoZfkOfEYlhIRDPn" alt=""><figcaption></figcaption></figure>

You can then use these tags inside Shopify for segmentation, special pricing, email campaigns, or access control.
