> For the complete documentation index, see [llms.txt](https://docs.powerfulform.com/llms.txt). Markdown versions of documentation pages are available by appending `.md` to page URLs; this page is available as [Markdown](https://docs.powerfulform.com/~/revisions/KRfi0fHdeAFeAhiPrH7G/customer-fields/customer-account-approval.md).
# Customer account approval
If you want full control over who becomes a customer on your store, for example for wholesale, membership, or restricted-access shops, use the **Account Approval** option. Instead of creating an account immediately, customers submit a form and wait for your review.
This is perfect for:
* Wholesale/B2B stores
* Member-only shops
* Stores that require customer validation before giving access
### 🛠️ Set up Require account approval
**Steps to manage**
1\. Open the app > click **Forms** > open the form you want to edit
2\. Click the **Integration** icon on the left side > enable **Shopify**
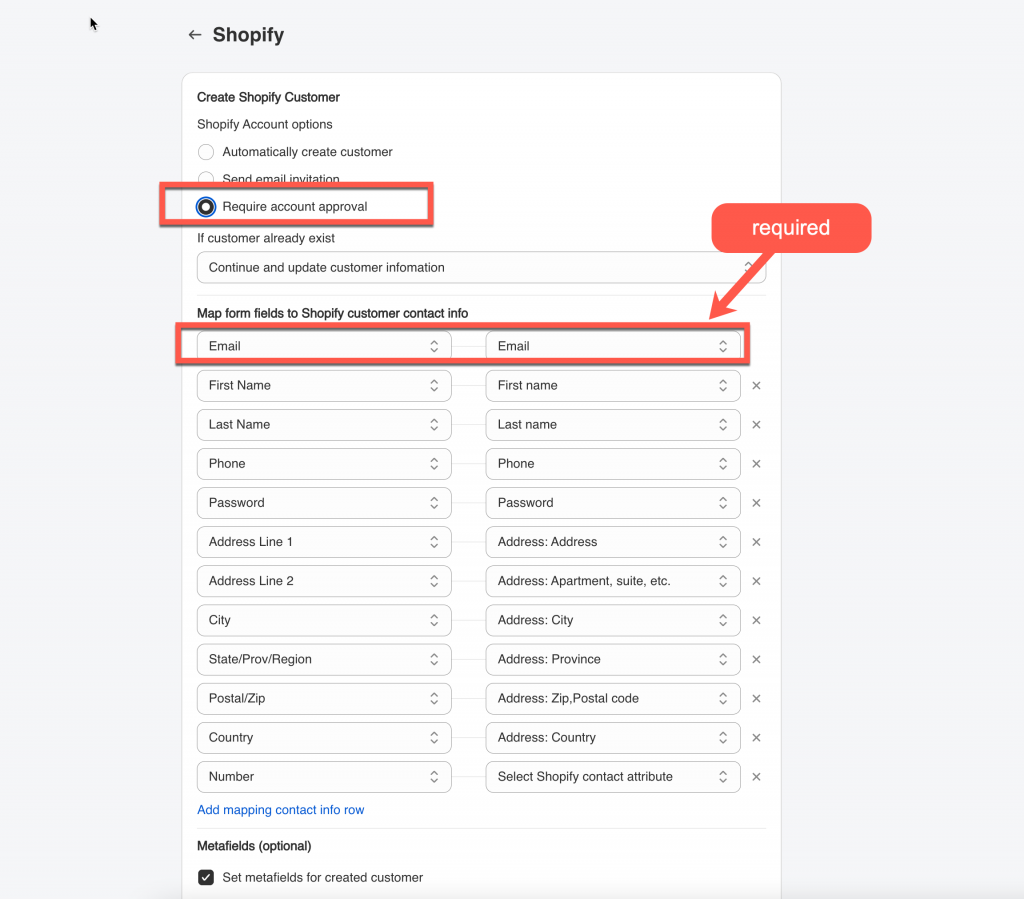
3\. Under **Account Options**, select **Require account approval**
4\. Select the shopify attributes (on the right) to map with form fields (on the left). For example the **Last name** field of the form should be mapped with Shopify **last name** attribute,
⚠️ **Email** field on the form is required to be mapped with **email** attribute of Shopify.
5\. Add customer tag, note, metafield and select Marketing status of customer account (optional)
**6. Save** the form to apply the change
Submit the form and check the result
***
### ✅ How to Approve a Customer Account
Note: only Customer accounts created from the form can show up in **Customers** tab of the app. For Approved account, if you change/delete the account in the app, the change will be reflected to the **Customers** in Shopify.
**Steps to manage**
1\. Open the app > click to **Customers** > select **Pending accounts** on the Customers filter dropdown to view
3\. Click customer name to open customer detail > click **Approve** button
4\. Confirm to approve and send an account invite to customer email on the popup.
Once approved:
* Shopify automatically sends a **Customer Account Invite** email
* The customer clicks the link to set their password
* Their customer account becomes active
***
### 🔄 Customer Account Approval Flow
If you enable the account option for ‘Require account approval‘, then each customer who submits the form will need to be manually approved before their account can be activated.
#### 1️⃣ Customer Submits Form
The customer fills out your form (e.g., Wholesale Application, Membership Registration).
Their entry is saved as a **Pending Account Request**.
#### 2️⃣ Admin Reviews Request
You review:
* Customer details
* Business information
* Uploads (if any)
* Tags or metafield values
* Any custom fields from the form
#### 3️⃣ Admin Approves or Rejects
Action
What Happens
Approve
Shopify sends an account invite → customer activates → profile created in Shopify
Reject
No account is created; optional rejection email may be sent
#### 4️⃣ Customer Activates Their Account
After approval, the customer opens the **Shopify account invite email**, sets their password, and logs in.
#### 5️⃣ Customer Record Created in Shopify
The new customer profile includes everything you mapped:
* Name
* Email
* Phone
* Address
* Tags
* Notes
* Metafields
And the customer now has full access to the account area of your storefront.
**🆘 Still Not Working?**
If you’ve checked everything above and the approval flow still doesn’t work:
📧 **Contact our support team:**