> For the complete documentation index, see [llms.txt](https://docs.powerfulform.com/llms.txt). Markdown versions of documentation pages are available by appending `.md` to page URLs; this page is available as [Markdown](https://docs.powerfulform.com/~/revisions/KRfi0fHdeAFeAhiPrH7G/app-integration/omnisend-integration.md).
# Omnisend integration
Integrating Globo Form Builder with Omnisend allows you to automatically add form submissions to your Omnisend contact lists, streamlining your email marketing efforts.
💳 **Paid plan required:** Omnisend integration is available on **paid plans only**.
### 🔑 Steps 1: Generating API Key
PowerfulForm needs an **Omnisend API Key** to connect securely to your account.
**✅ How to generate an Omnisend API key**
1. Log in to your **Omnisend** account > navigate to **My Account** > **API Keys**.
2. Click **Create API Key** > enter a name for your API key (e.g., "Globo Form Integration") and click **Save**.
3. Copy the generated API key for use in the next step.
For detailed instructions, refer to Omnisend's official guide: [How to create an API key](https://support.omnisend.com/en/articles/1061890-generating-api-key)
***
### 🔌 Step 2: Add Omnisend API Key to the app settings (in PowerfulForm)
Now connect Omnisend inside Powerful Form.
**✅ Steps**
1. Open the app > click **Settings > Third party integration** > hover **Omnisend** > click **Config**
2. Enter **Omnisend API key** field created in the **Steps 1** above
3. Click **Save** to update the changes
***
### 🧩 Step 3: Connect form data to Omnisend (in Form Builder)
This step decides:
* which Omnisend audience/list receives the contact
* how your form fields map to Omnisend contact fields
1\. Open the app > click **Forms** > open the form you want to deal with
2\. Click **Integration** icon on the left side > enable **Omnisend** > click on **Omnisend** option
3. Select the Omnisend **List**/**Audience** you want to add contacts to
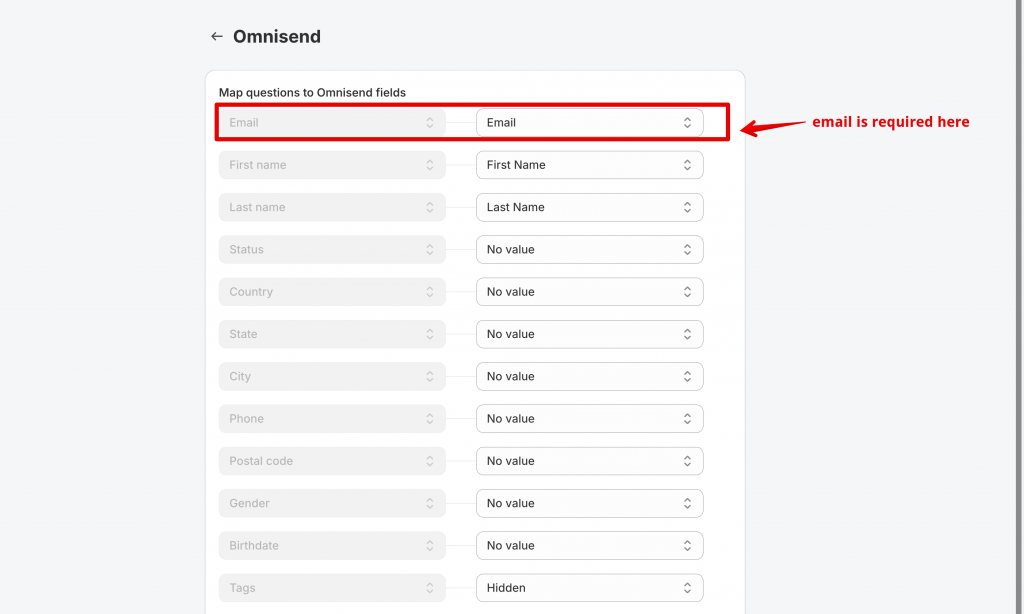
4. Map your fields. For example:
* 📧 **Email** ← your form’s Email field
* 👤 **First name / Last name** ← your form’s name fields
* 📱 **Phone** (optional) ← your form’s phone field
⭐ **Important:** Always map **Email** if you want Omnisend to create/update a contact reliably.
4\. Click **Save** to update the changes.
***
### ✅ Test & Check Your Results (in Omnisend)
1. Submit the form once (use a real email for testing)
2. Open **Omnisend**
3. Go to **Audience / Contacts**
4. Confirm the new contact appears (and fields are filled correctly)
***
### **🛠️ Troubleshooting**
#### 🔒 “Invalid API key” / cannot connect
* Make sure you copied the API key from **My Account → API Keys** in Omnisend.
* Remove any extra spaces before/after the key.
* Crea**te a new API key in Omnisend and replace it in PowerfulForm if the old one was revoked.**
#### 📭 Contacts are not being added after submission
* Confirm Omnisend is enabled on the correct form.
* Make sure you clicked Save after mapping.
* Submit a new test entry (old submissions won’t sync automatically).
* Ensure the submission contains a valid email address.
#### 🧩 Some fields are blank in Omnisend
Re-check mapping (example: “Full name” mapped into “First name” may not display as expected).