> For the complete documentation index, see [llms.txt](https://docs.powerfulform.com/llms.txt). Markdown versions of documentation pages are available by appending `.md` to page URLs; this page is available as [Markdown](https://docs.powerfulform.com/getting-started/new-form.md).

# Create a new form

Create a form from scratch and place it on your store.

## 📝 Steps to add form

{% stepper %}
{% step %}

### Add a new form

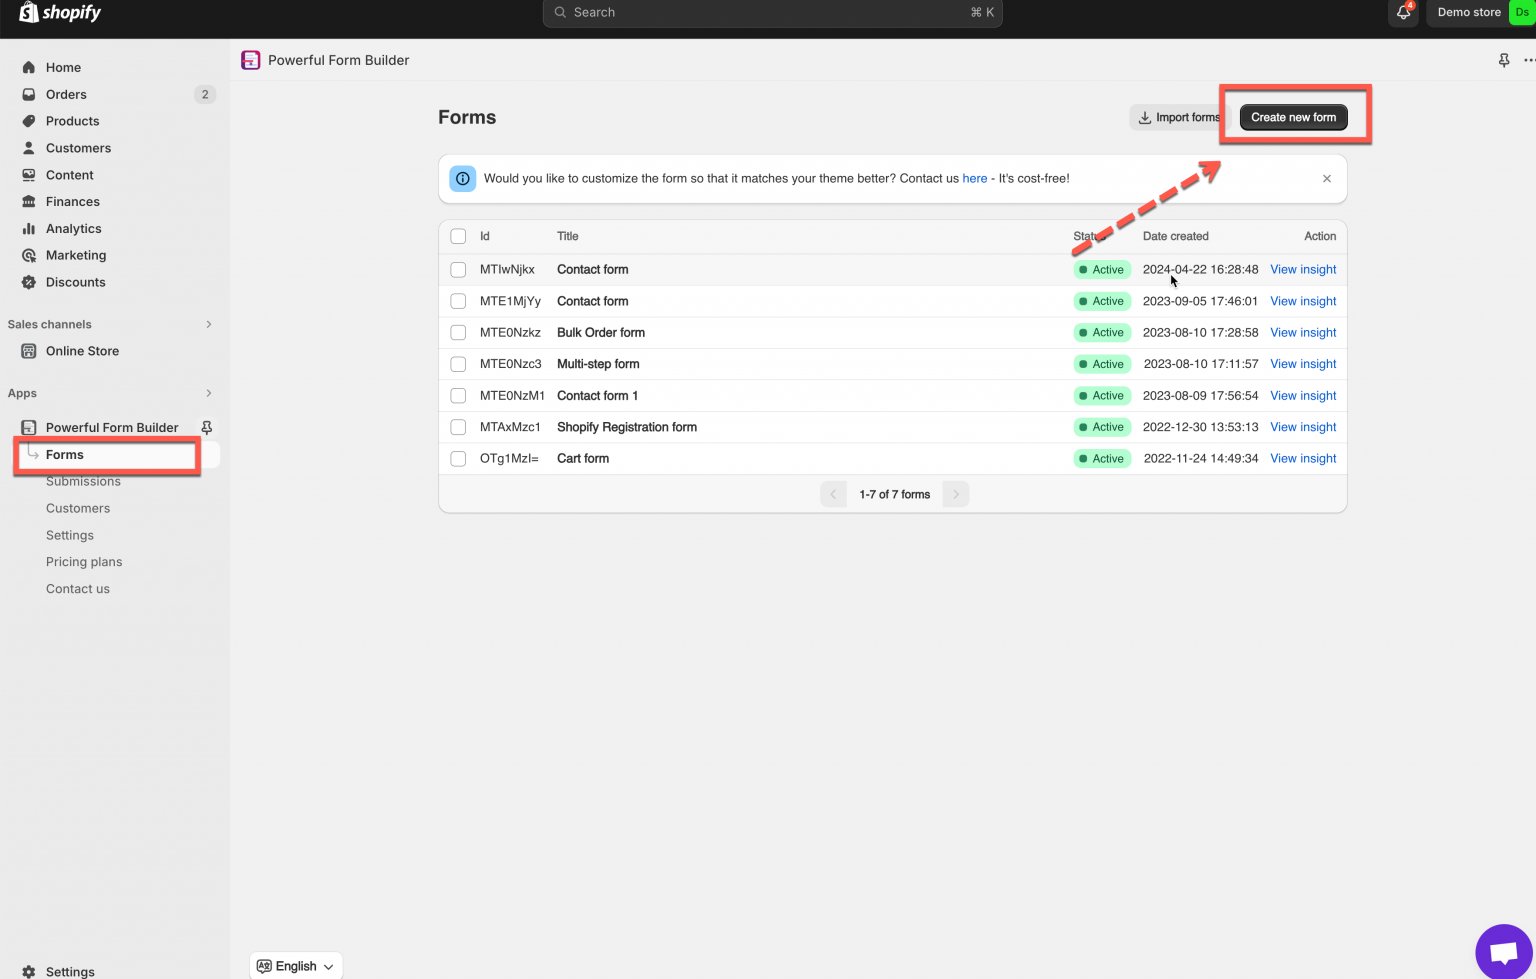
* In your app dashboard, go to **Forms → Create new form**

<figure><img src="https://2907469752-files.gitbook.io/~/files/v0/b/gitbook-x-prod.appspot.com/o/spaces%2FehM2rz7MmKkWcJmgvJOe%2Fuploads%2Fgit-blob-b1b88373568c1f8b3be5ef4e44cae1c919ae1657%2Fscreenshot-old-quick-start-create-a-new-form-1.png?alt=media" alt=""><figcaption></figcaption></figure>

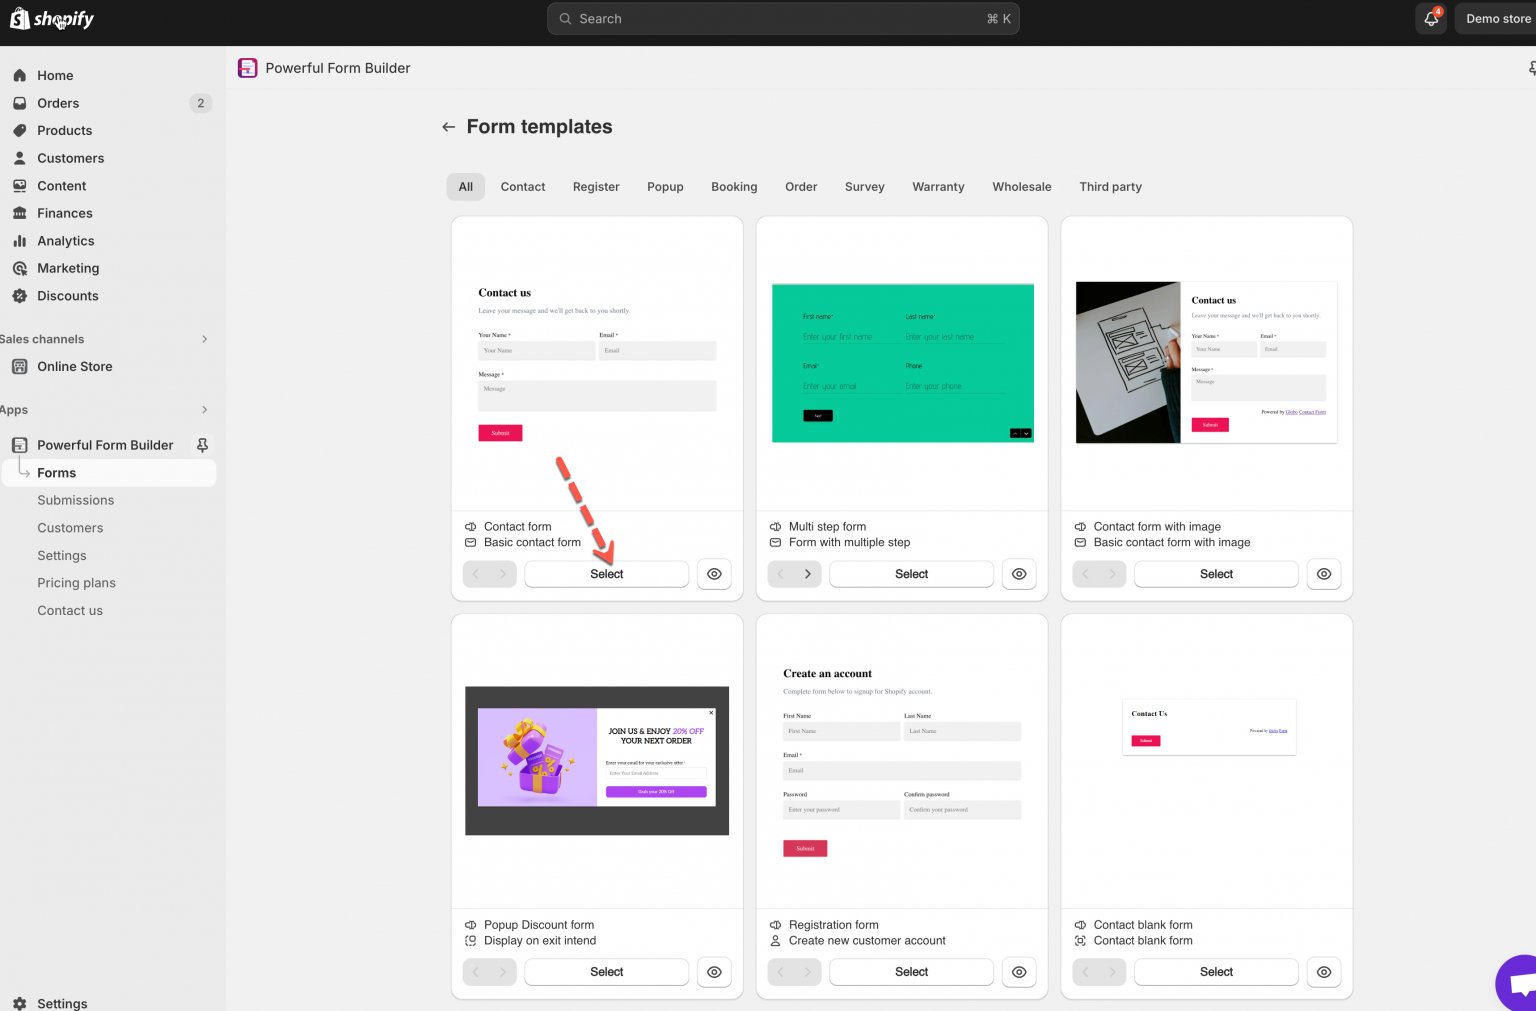
* Choose a form template

**Blank Form** – start from zero

<figure><img src="https://2907469752-files.gitbook.io/~/files/v0/b/gitbook-x-prod.appspot.com/o/spaces%2FehM2rz7MmKkWcJmgvJOe%2Fuploads%2Fgit-blob-aaa15423e450729912ad0c12343bde757423e151%2F2026-09-14_09-33-52.png?alt=media" alt=""><figcaption></figcaption></figure>

**Template** – choose a ready-made form and edit it

<figure><img src="https://2907469752-files.gitbook.io/~/files/v0/b/gitbook-x-prod.appspot.com/o/spaces%2FehM2rz7MmKkWcJmgvJOe%2Fuploads%2Fgit-blob-10b4384e1cc94ab6a76994cb188d37e4ce5a6820%2Fscreenshot-old-quick-start-create-a-new-form-2.png?alt=media" alt=""><figcaption></figcaption></figure>
{% endstep %}

{% step %}

### Build Your Form

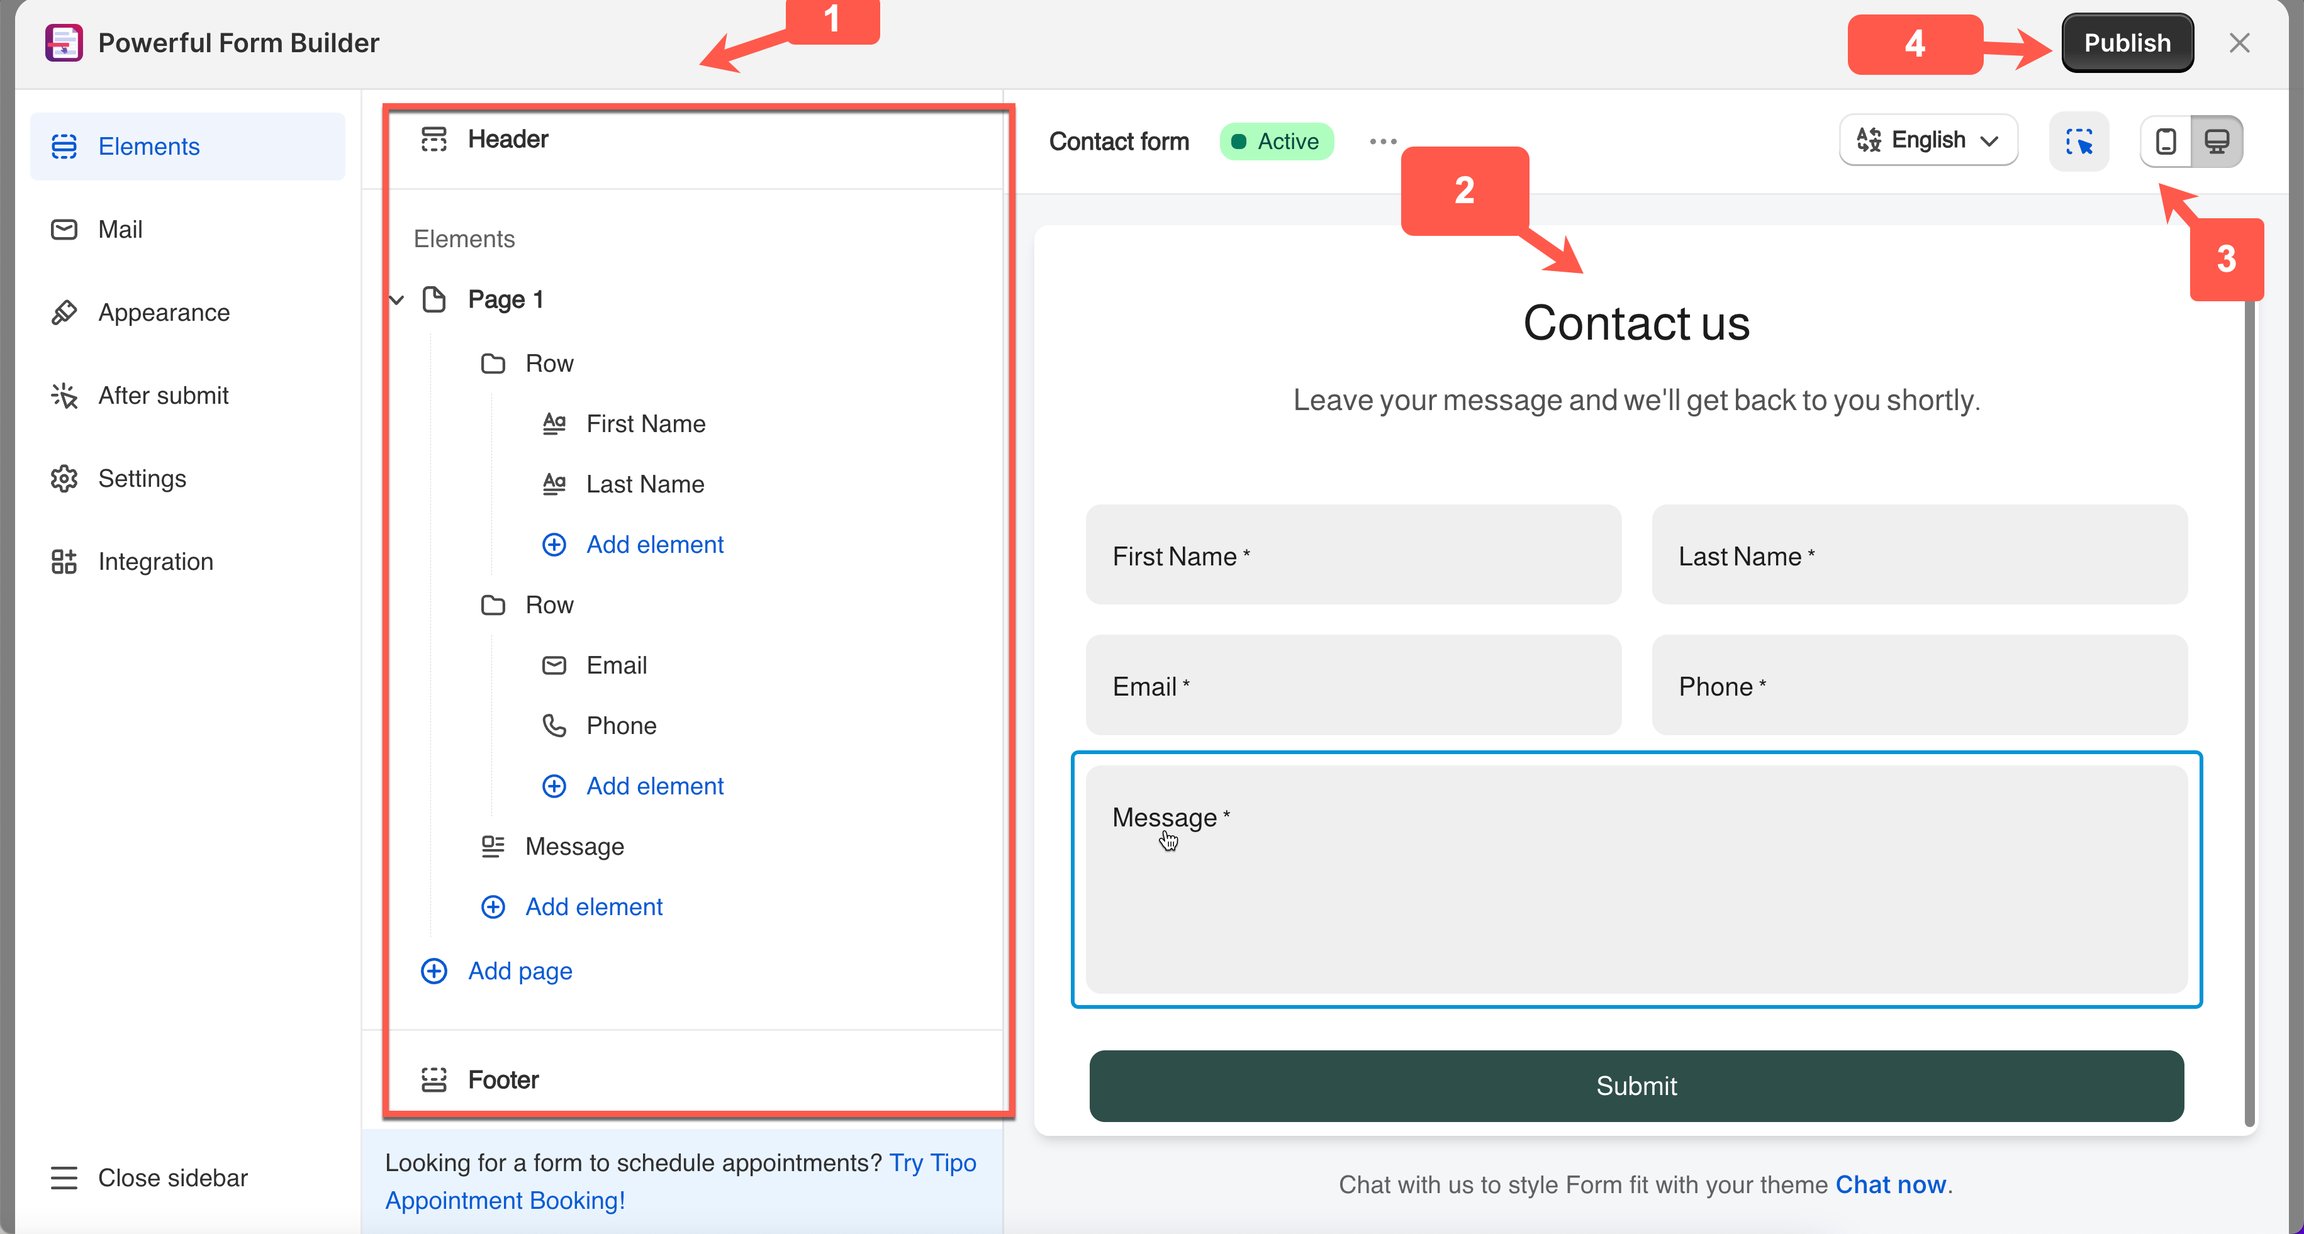
After choosing a form, you will enter the form editing screen.

#### What you see in the Form Builder:

* **Left side:** form fields and field settings
* **Right side:** live preview of your form
* **Top:** Desktop/Mobile view toggle
* **Page selector:** choose where the form will appear in your store

<figure><img src="https://2907469752-files.gitbook.io/~/files/v0/b/gitbook-x-prod.appspot.com/o/spaces%2FehM2rz7MmKkWcJmgvJOe%2Fuploads%2Fgit-blob-09cc03326ee2e19c5de522e7d10b1f0b21674930%2Fscreenshot-old-quick-start-create-a-new-form-3.png?alt=media" alt=""><figcaption></figcaption></figure>
{% endstep %}

{% step %}

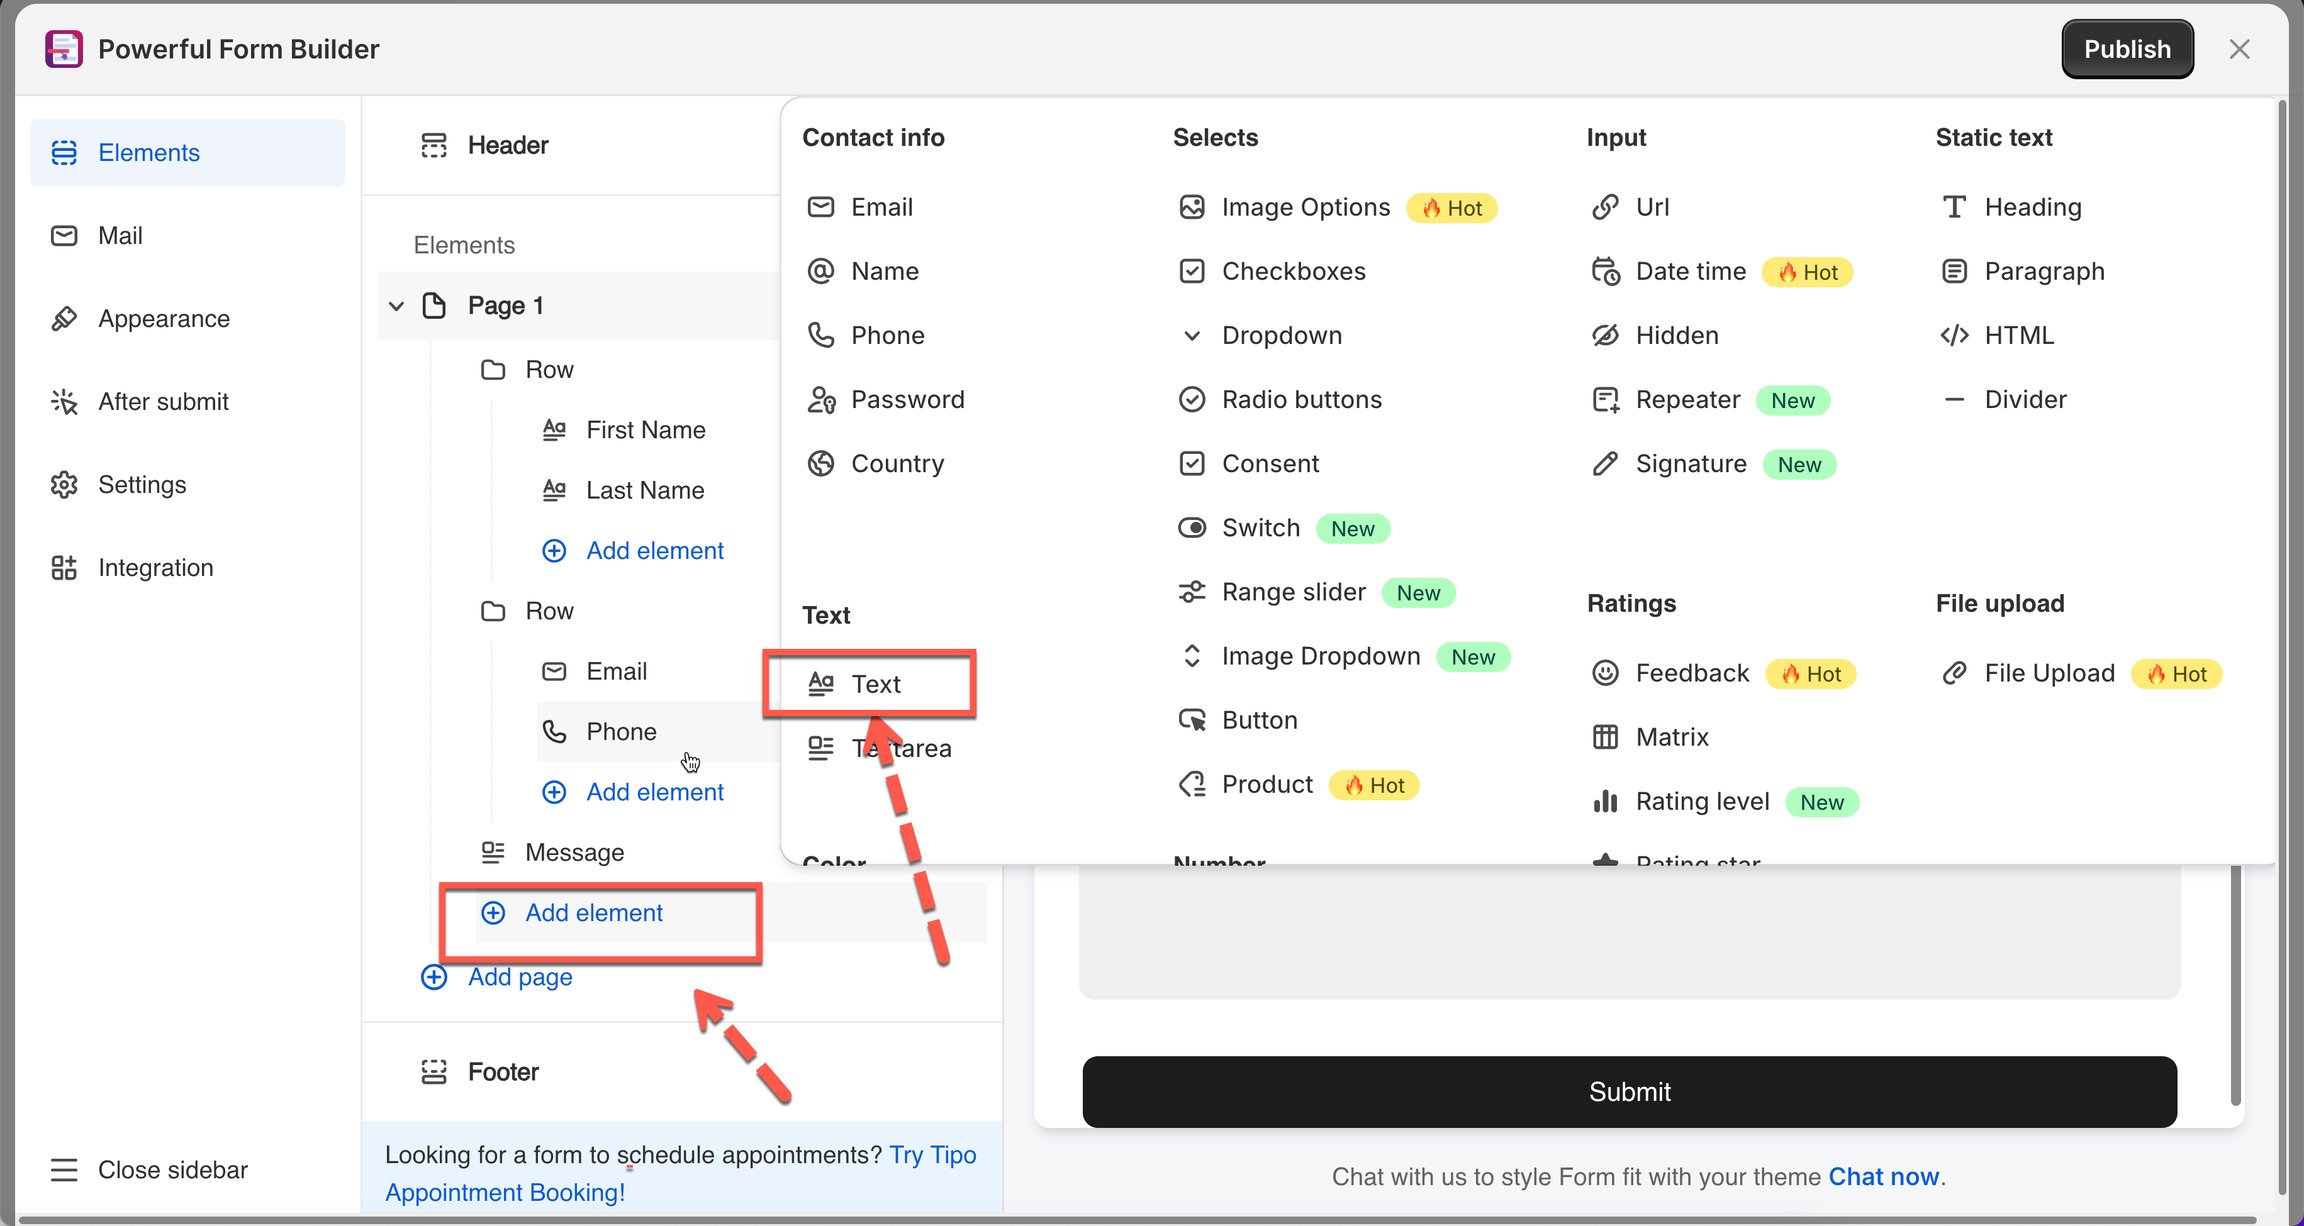
### Add Fields to Your Form

* Click **Add Elements** on the left side.
* Select the field type you want to add:
  * Text
  * Email
  * Phone
  * Dropdown
  * Checkbox
  * File Upload
  * Date / Time
  * Product Selector, and more
* Click to insert the field into your form.

<figure><img src="https://2907469752-files.gitbook.io/~/files/v0/b/gitbook-x-prod.appspot.com/o/spaces%2FehM2rz7MmKkWcJmgvJOe%2Fuploads%2Fgit-blob-17233e9340ecf59b8077055f3b0cdcd782b0eca3%2Fscreenshot-old-quick-start-create-a-new-form-4.png?alt=media" alt=""><figcaption></figcaption></figure>
{% endstep %}

{% step %}

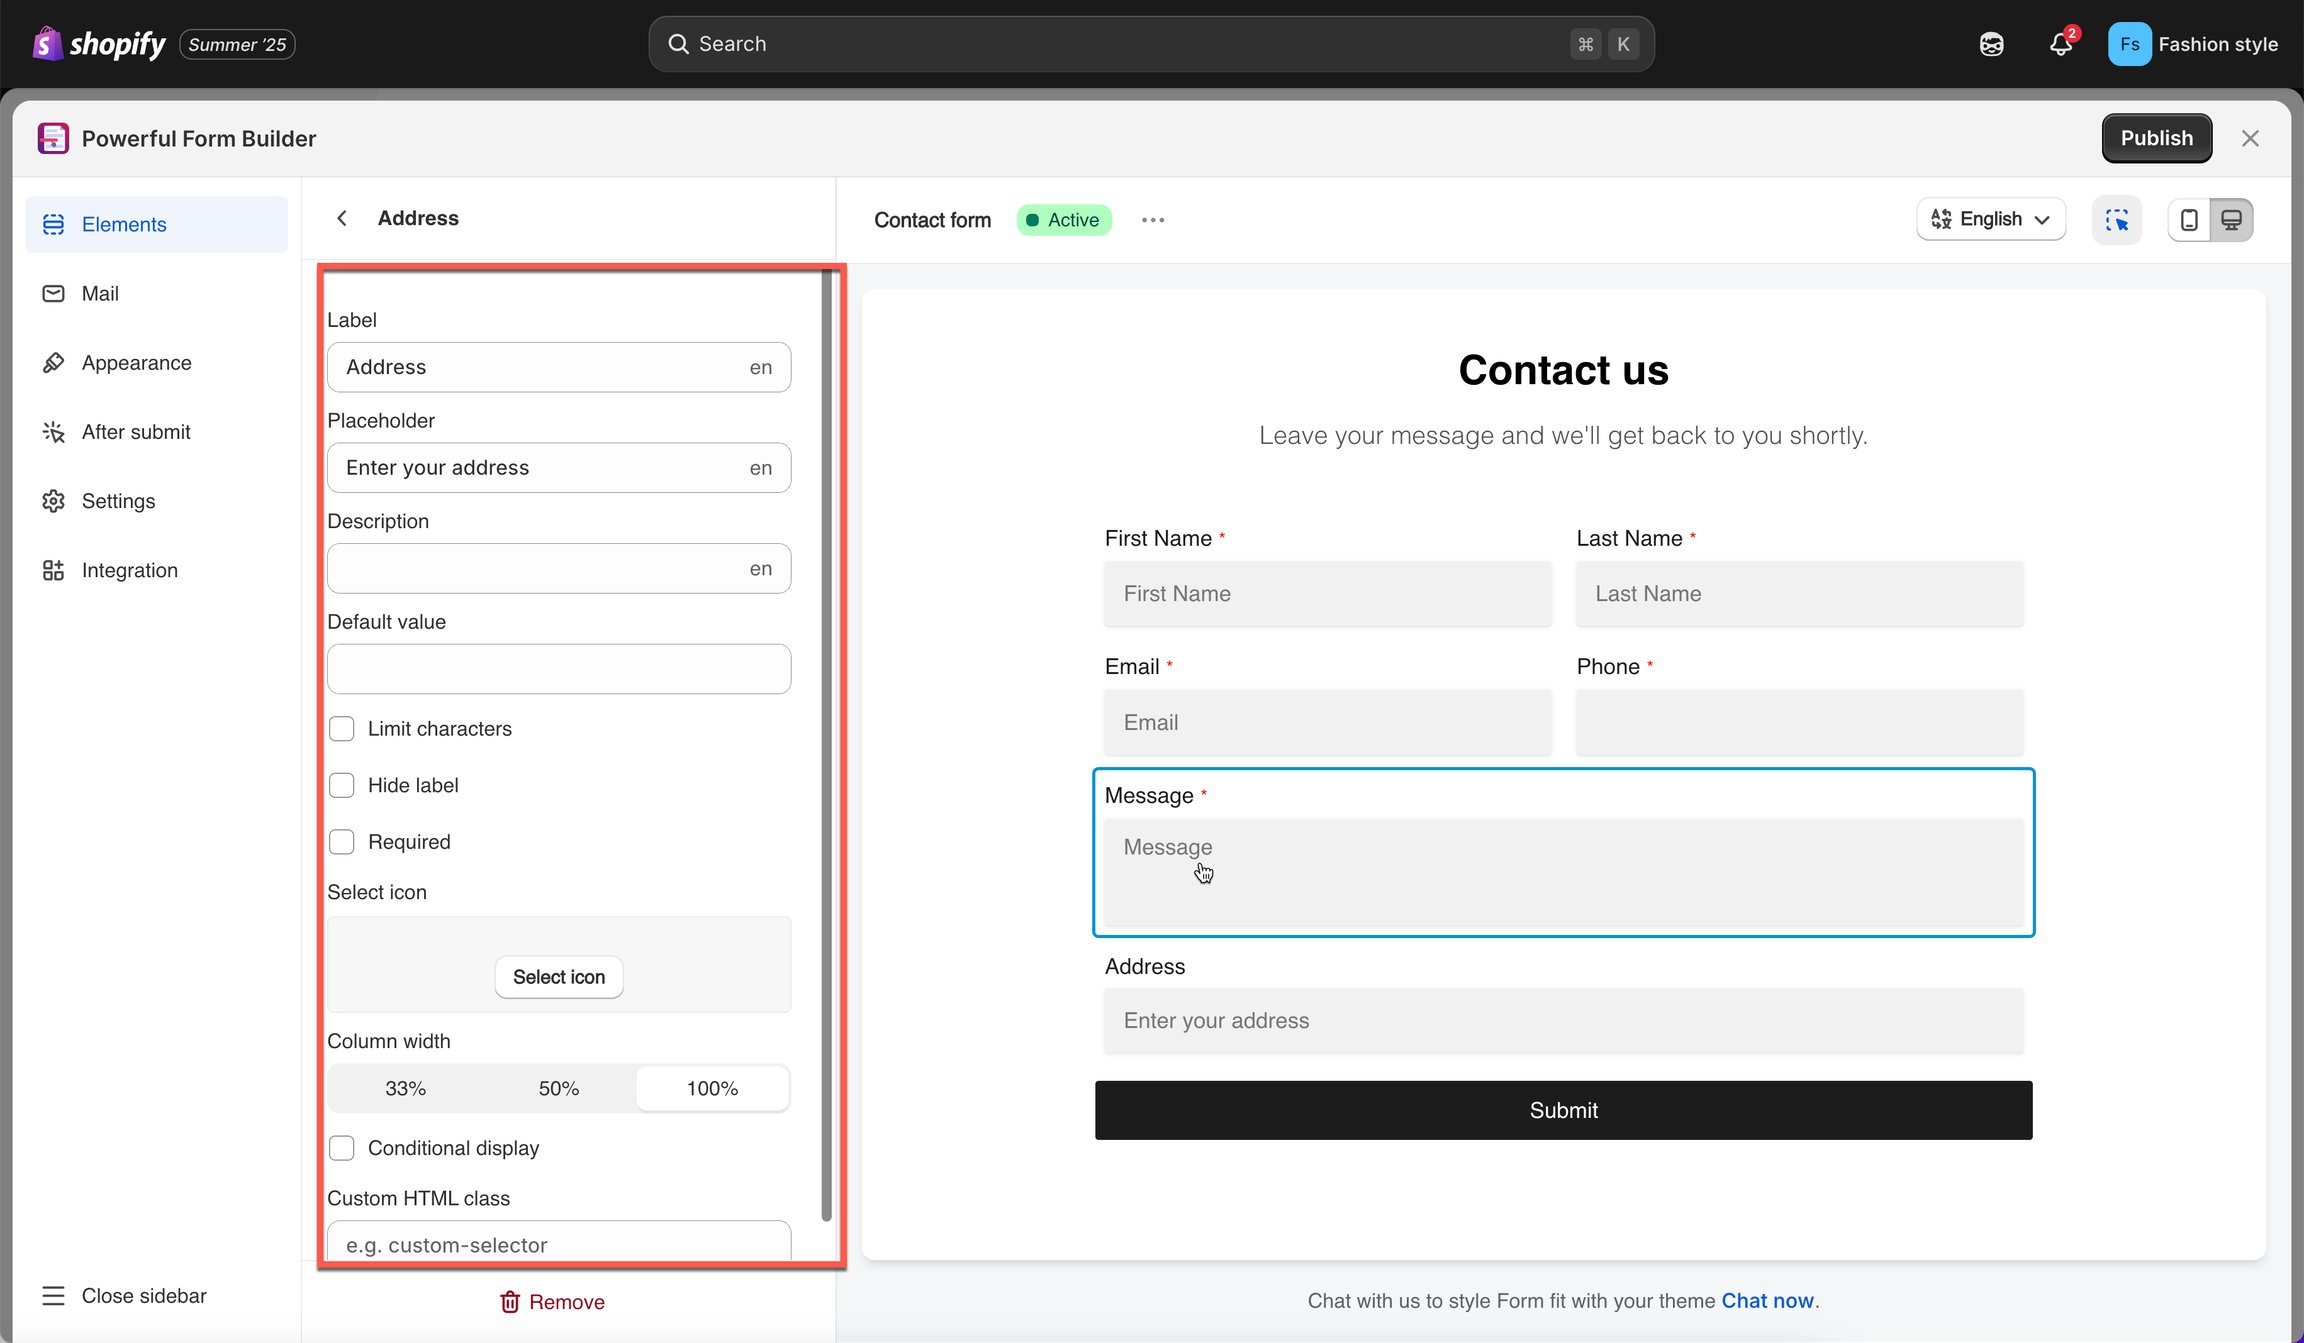
### Edit a Field

Click any field in the live preview to open its settings.

#### Common field settings:

* **Label:** the field name (e.g., “Full Name”)
* **Hide Label:** hide the label text
* **Keep Label Space:** keep spacing but hide label
* **Required:** make the field mandatory
* **Column Width:** choose
  * 1/3 width
  * 1/2 width
  * Full width

<figure><img src="https://2907469752-files.gitbook.io/~/files/v0/b/gitbook-x-prod.appspot.com/o/spaces%2FehM2rz7MmKkWcJmgvJOe%2Fuploads%2Fgit-blob-bb3af421debf192032ba983e73866cfd68b5c4f4%2Fscreenshot-old-quick-start-create-a-new-form-5.png?alt=media" alt=""><figcaption></figcaption></figure>
{% endstep %}

{% step %}

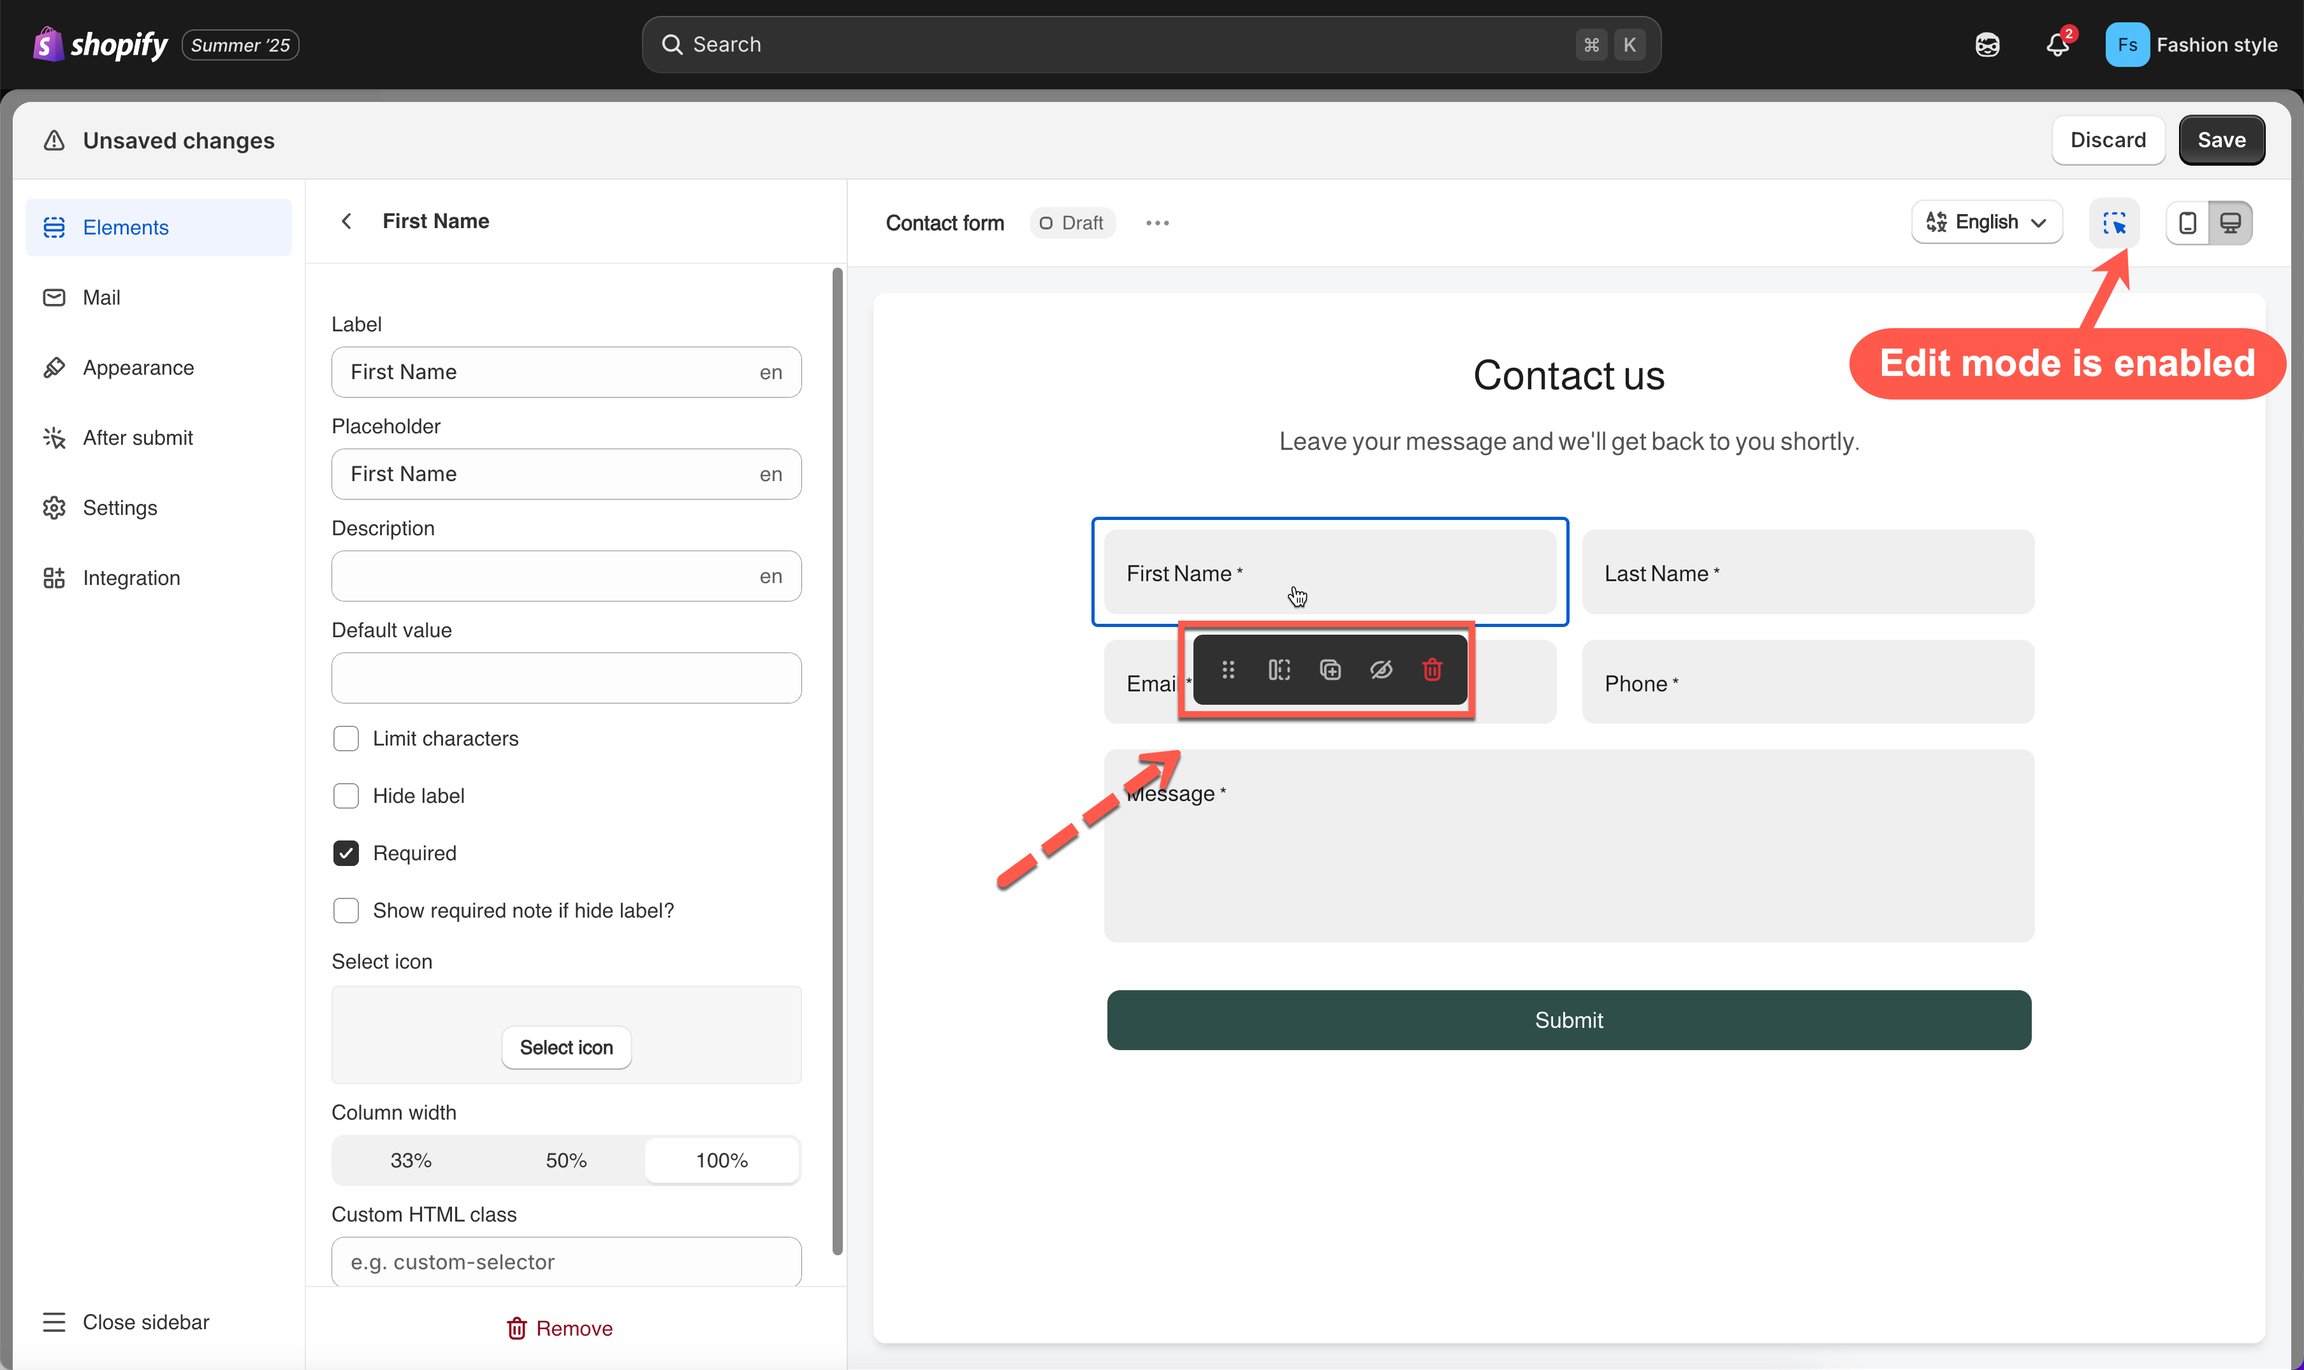
### Use the Field Toolbar

When hovering over a field in the preview, a small toolbar appears.

#### Toolbar actions:

* **Move** – drag the field to a new position
* **Width** – change to 1/3, 1/2, or full width
* **Duplicate** – copy the field
* **Hide** – hide the field from customers
* **Delete** – remove the field

<figure><img src="https://2907469752-files.gitbook.io/~/files/v0/b/gitbook-x-prod.appspot.com/o/spaces%2FehM2rz7MmKkWcJmgvJOe%2Fuploads%2Fgit-blob-8b54fad85f0c9419afb752738e350bcd2bcd9a10%2Fscreenshot-old-quick-start-create-a-new-form-6.png?alt=media" alt=""><figcaption></figcaption></figure>
{% endstep %}

{% step %}

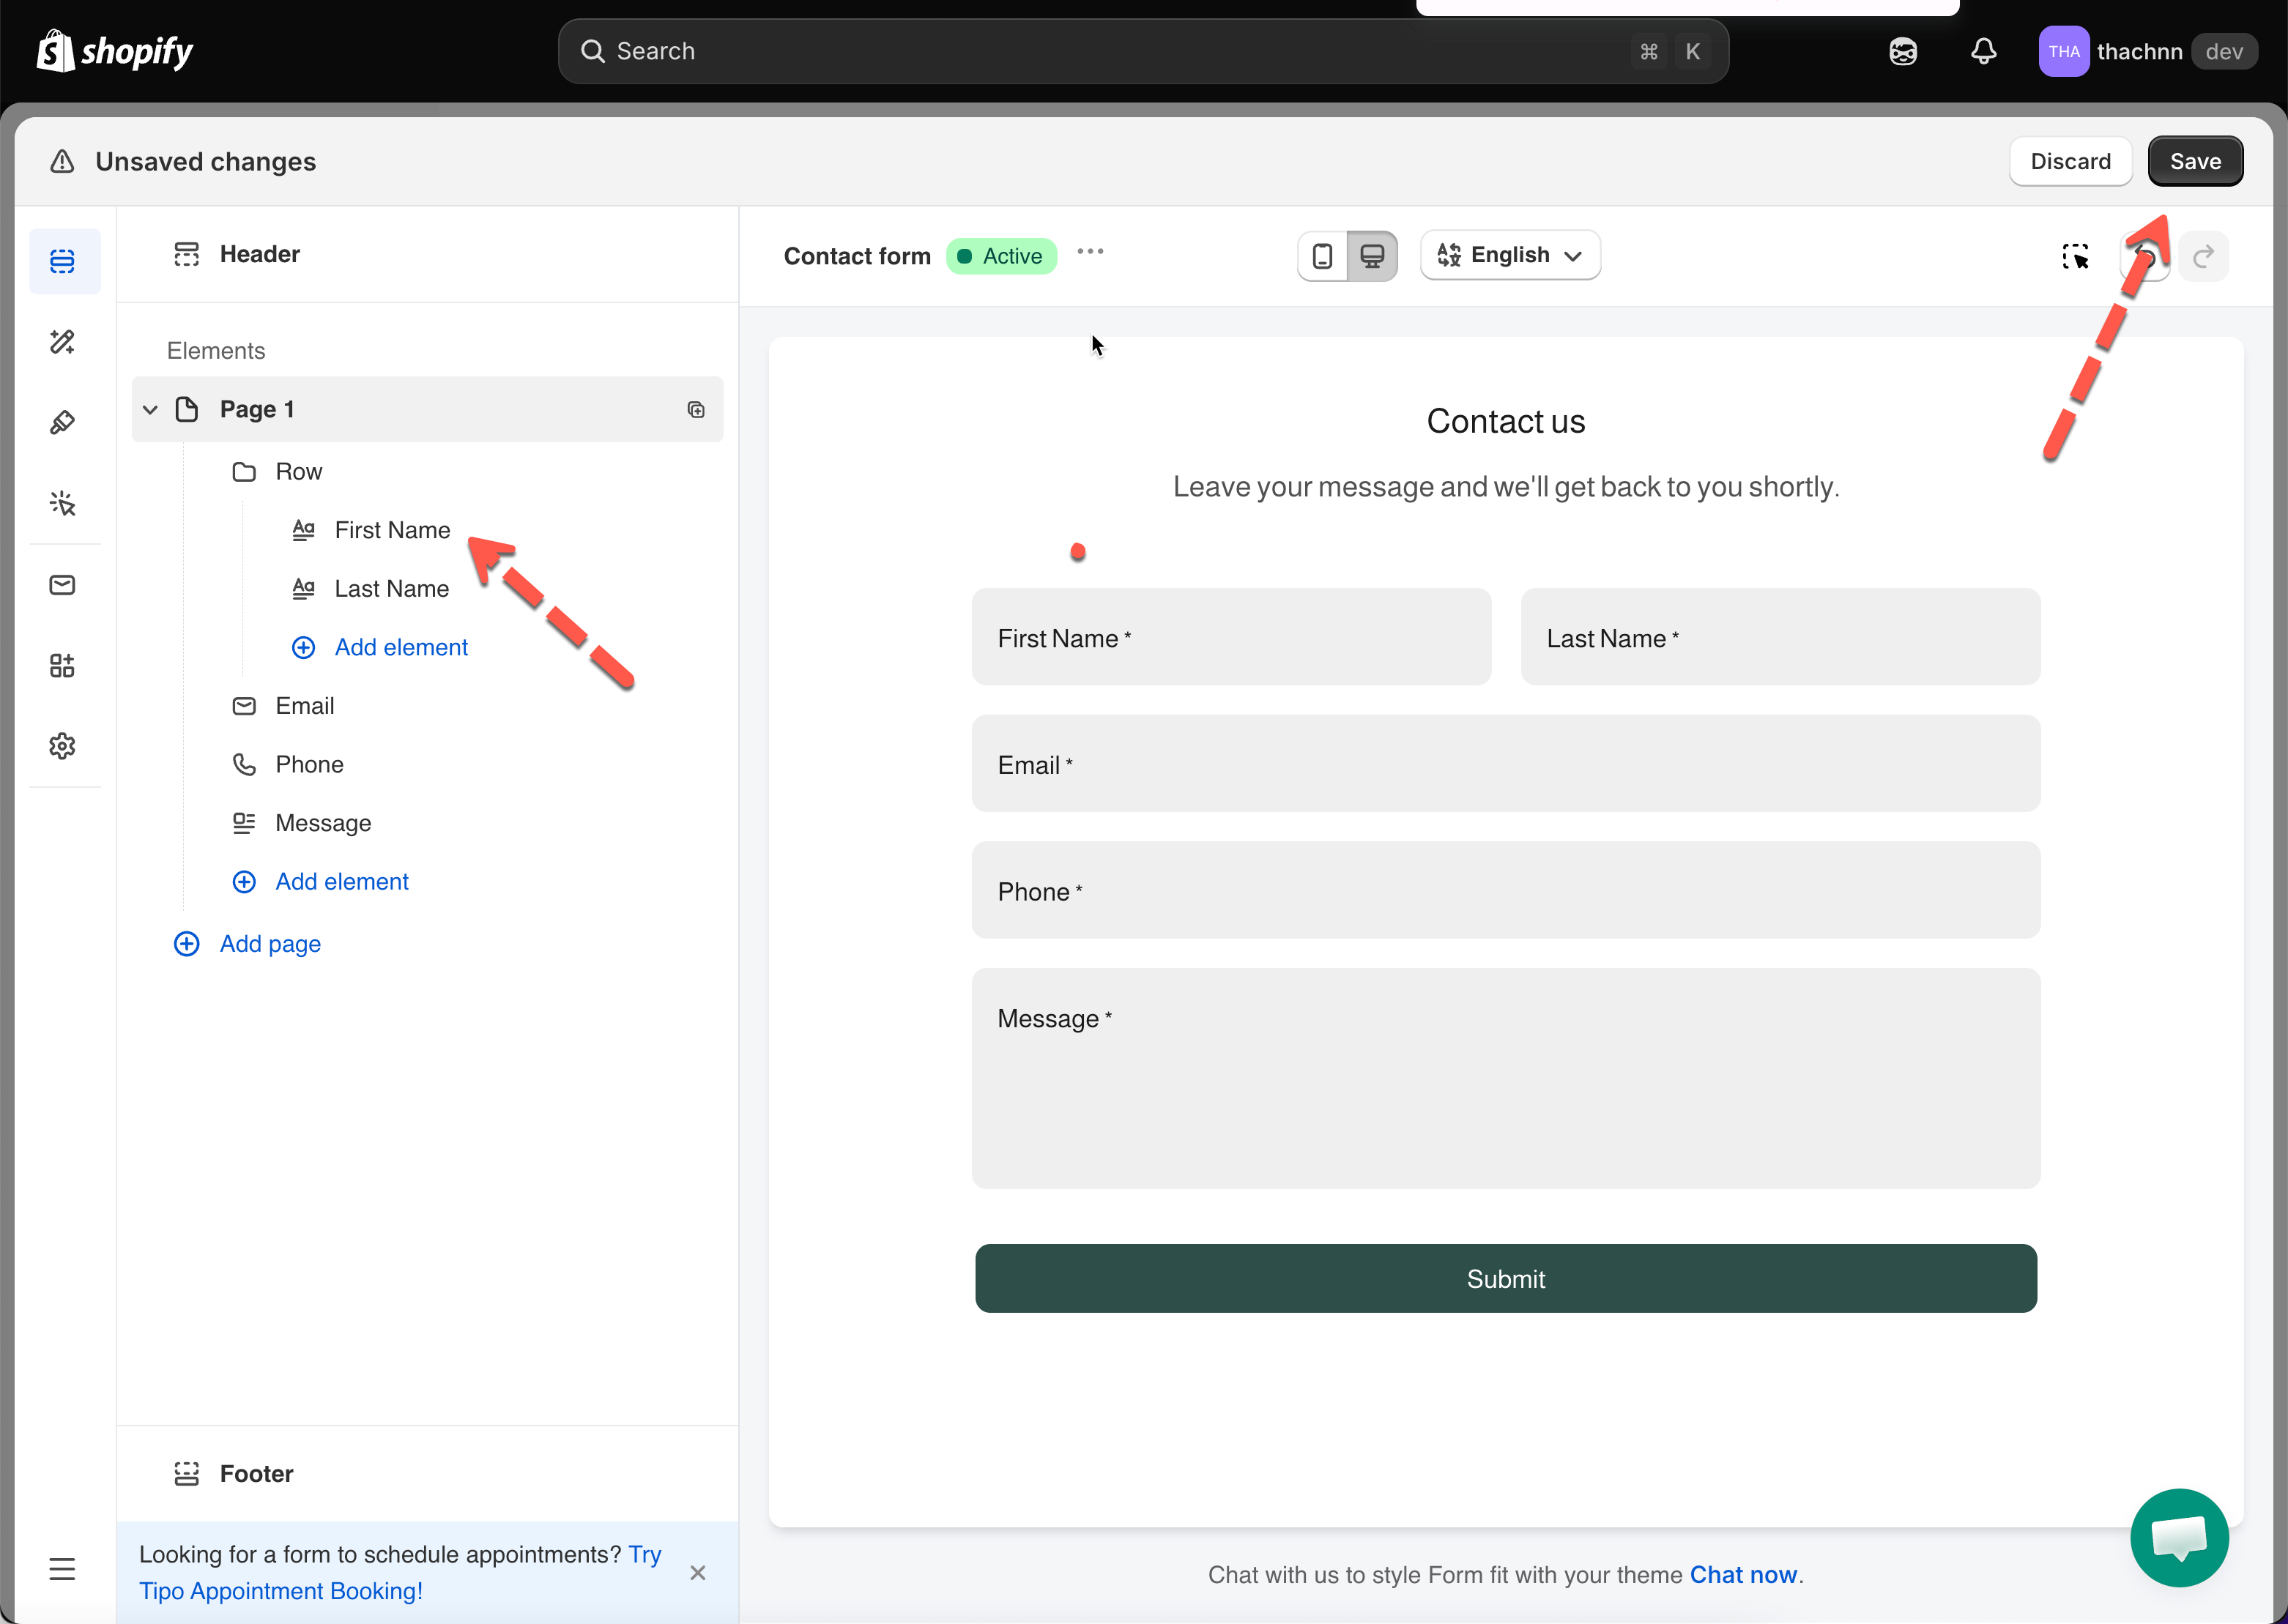
### Save Your Form

Click **Save** to store all changes.

{% hint style="info" %}
⚠️ Don’t forget this step — unsaved changes will be lost.
{% endhint %}
{% endstep %}

{% step %}

### Display Your Form on Your Store

After saving, choose how you want to display the form.

You can show the form on:

* A page section (using Shopify’s theme editor)
* A specific page
* The homepage
* A product page
* Or via embed code / shortcode

Follow the display instructions to place the form exactly where you want it.

* Click **Save** once your form is ready
* To display the form on your store, embed it on any page using the provided shortcode or section block

[Learn more about displaying your form on the front store](/display-and-placement/specific-page.md)
{% endstep %}
{% endstepper %}

## 🎥 Tutorial video

{% embed url="<https://www.youtube.com/watch?v=Cs1HzLzxnYE>" %}

***

## 📋 Form templates

{% stepper %}
{% step %}

### **Open the gallery**

Open the app > click **Forms** > **Create new form** button > Browse pre-built forms

<figure><img src="https://2907469752-files.gitbook.io/~/files/v0/b/gitbook-x-prod.appspot.com/o/spaces%2FehM2rz7MmKkWcJmgvJOe%2Fuploads%2Fgit-blob-d73860b4e79850a2b211f035f304f1ddf448dadd%2Fimage%20(9).png?alt=media" alt=""><figcaption></figcaption></figure>
{% endstep %}

{% step %}

### Pick a category

<table><thead><tr><th width="190.2999267578125">Category</th><th>Examples</th></tr></thead><tbody><tr><td>Contact</td><td>Basic, with image, floating</td></tr><tr><td>Register</td><td>Sign-up, Shopify registration</td></tr><tr><td>Popup</td><td>Discount popup</td></tr><tr><td>Booking</td><td>Appointments, reservations</td></tr><tr><td>Order</td><td>Bulk order, cart, custom order</td></tr><tr><td>Survey</td><td>Feedback, seasonal (e.g. BFCM)</td></tr><tr><td>Warranty</td><td>Registration, claims, returns</td></tr><tr><td>Wholesale</td><td>B2B, trade applications</td></tr><tr><td>Third party</td><td>Klaviyo signup, etc.</td></tr></tbody></table>

<figure><img src="https://2907469752-files.gitbook.io/~/files/v0/b/gitbook-x-prod.appspot.com/o/spaces%2FehM2rz7MmKkWcJmgvJOe%2Fuploads%2Fgit-blob-35ef2871e40cd30ff8949fb99d0e1e5e4bc85ef1%2Fimage%20(10).png?alt=media" alt=""><figcaption></figcaption></figure>
{% endstep %}

{% step %}

### Select a template

Preview it on your storefront (optional) > click **Select**.
{% endstep %}

{% step %}

### Edit the form and save it

<figure><img src="https://2907469752-files.gitbook.io/~/files/v0/b/gitbook-x-prod.appspot.com/o/spaces%2FehM2rz7MmKkWcJmgvJOe%2Fuploads%2Fgit-blob-c47777ed8e392962f151d1dd647fbff5b862cdfd%2F2026-09-25_17-34-34.png?alt=media" alt=""><figcaption></figcaption></figure>
{% endstep %}
{% endstepper %}

{% hint style="info" %}
A template can include a field type your plan does not cover. The form is still created; the field shows an upgrade prompt in the editor until you upgrade or remove it. See [Plans and billing](https://globosoftware.gitbook.io/globosoftware-docs/settings/plans-and-billing).<br>
{% endhint %}

## Next steps

* [Create a Form with AI](/getting-started/with-ai.md) — let AI build the fields instead.
* [Build your form](/build-your-form/build-your-form.md) — every element and setting.
* [Publish the form to a page](/getting-started/quickstart/publish-the-form.md) — put it on your store.